初试轻量级RPC框架总结

1. RPC

RPCRemote Procedure Call(远程过程调用),直白的说就是:向调用本地服务一样调用远程计算机的服务。

由于现代应用日益复杂,单台机器显然不能满足需求。于是将业务按照一定的方式拆分开来,分散到多台机器上(或者一台机器上的多个进程),让每台机器各司其职,物尽其用。SOA和当前盛行的微服务便是从此变革历史中出现的产物。

为了达到各个分散在不同机器上的服务做到相互独立又相互联系,当计算机A上的服务ServiceA需要调用计算机B上的服务ServiceB时,需要一种互相遵守的协议来完成一次调用。

而这些协议便是RPC框架包含的内容。

以下从三个方面分析了高性能RPC的三个关键要素:

  • 传输协议

RPC 可基于 HTTPTCP 协议,Web Service 就是基于 HTTP 协议的 RPC,它具有良好的跨平台性,但其性能却不如基于 TCP 协议的 RPC。有两方面会直接影响 RPC 的性能,一是传输方式,二是序列化

  • 序列化方式

众所周知,TCP 是传输层协议,HTTP 是应用层协议,而传输层较应用层更加底层,在数据传输方面,越底层越快,因此,在一般情况下,TCP 一定比 HTTP 快。就序列化而言,Java 提供了默认的序列化方式,但在高并发的情况下,这种方式将会带来一些性能上的瓶颈,于是市面上出现了一系列优秀的序列化框架,比如:Protobuf、Kryo、Hessian、Jackson 等,它们可以取代 Java 默认的序列化,从而提供更高效的性能。

  • 高并发(IO方式)

为了支持高并发,传统的阻塞式 IO 显然不太合适,因此我们需要异步的 IO,即 NIO。Java 提供了 NIO 的解决方案,Java 7 也提供了更优秀的 NIO.2 支持,用 Java 实现 NIO 并不是遥不可及的事情,只是需要我们熟悉 NIO 的技术细节。

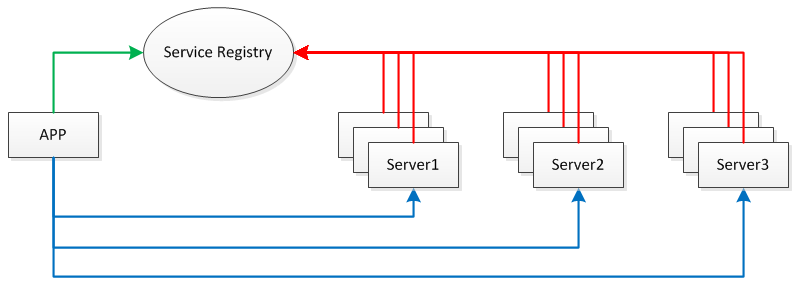
另外,服务部署在分布式环境下的不同节点,因此还需要提供一个服务注册与发现中心(Service Registry),让客户端发现可用的服务。应用、服务、注册表之间的关系如下图:

考虑到上述的几个关键要素,做出如下选型:

  1. Spring : 业界权威的依赖注入框架
  2. Netty: 封装了Java的NIO的一个网络框架
  3. Protostuff: 基于Google的Protobuf的序列化框架,面向POJO,无需编写、编译.proto文件
  4. Zookeeper: 分布式系统的必备选择,提供服务发现和服务注册功能

参考了某篇博客,搭建一个基于TCP协议,采用Protostuff序列化方式,提供NIO支持且具备服务注册和发现的轻量级RPC框架。

2. 搭建轻量级RPC框架

第一步:编写服务接口

没有规矩,不成方圆。制定客户端和服务端共同遵循的接口。

1
2
3
public interface IHelloService {
public String hello(String name);
}

第二步:编写服务接口的实现类

由于服务端提供服务,因此需要在服务端实现该接口,以便客户端后续通过RPC调用。

由于不同的服务是按照接口来区分的,而同一个服务实现类可以实现不同的接口(这些接口可能是服务接口或者其他接口),换句话说一个服务实现类可以提供多种不同的服务。

为了达到标示某个服务实现类对应哪个服务接口,需要自定义一个注解,然后通过Spring扫描包含该注解的Bean,这样就可以发现某个服务接口对应哪个服务实现类。

  1. 自定义注解

    1
    2
    3
    4
    5
    6
    @Target({ElementType.TYPE})
    @Retention(RetentionPolicy.RUNTIME)
    @Component// 表明可被Spring扫描
    public @interface RpcService {
    Class<?> value();
    }

  2. 编写服务实现类

    1
    2
    3
    4
    5
    6
    7
    8
    @RpcService(IHelloService.class)//稍后通过Spring扫描
    public class HelloWorldImpl implements IHelloService {

    public String hello(String name) {
    // TODO Auto-generated method stub
    return "Hello " + name + " ==> from remote greeting";
    }
    }

第三步: 配置服务端

  1. 由于使用了Spring实现依赖注入,此处使用了XML方式声明Bean
1
2
3
4
5
6
7
8
9
10
11
12
13
14
15
16
17
18
19
20
21
22
23
24
<?xml version="1.0" encoding="UTF-8"?>
<beans xmlns="http://www.springframework.org/schema/beans"
xmlns:xsi="http://www.w3.org/2001/XMLSchema-instance"
xmlns:context="http://www.springframework.org/schema/context"
xsi:schemaLocation="http://www.springframework.org/schema/beans
http://www.springframework.org/schema/beans/spring-beans-3.0.xsd
http://www.springframework.org/schema/context
http://www.springframework.org/schema/context/spring-context-3.0.xsd">

<context:component-scan base-package="dlut.rpc"/>

<context:property-placeholder location="classpath:rpc.properties"/>

<!-- 配置服务发现组件 -->
<bean id="serviceRegistry" class="dlut.rpc.server.ZookeeperServiceRegistry">
<constructor-arg name="registryAddress" value="${rpc.registry_address}"/>
</bean>

<!-- 配置 RPC Server-->
<bean id="rpcServer" class="dlut.rpc.server.RpcServer">
<constructor-arg name="serverAddress" value="${rpc.server_address}"/>
<constructor-arg name="serviceRegistry" ref="serviceRegistry"/>
</bean>
</beans>

服务端的Spring配置声明了如下内容:

  • 扫描路径
  • 属性文件的路径
  • 两个Bean,一个是ZookeeperServiceRegistry,另一个是RpcServer,且都通过构造器注入。
  1. 编写rpc.properties配置文件

    1
    2
    rpc.registry_address=127.0.0.1:2181
    rpc.server_address=127.0.0.1:8000

    主要是配置一些端口信息

第四步: 编写服务端代码

由于RpcServer相当于是一个运行的入口,因此需要在所有Bean实例化后,做一些初始化的操作,这里RpcServer本来也是一个由Spring IoC容器管理的Bean(上面的服务器的Spring.xml配置中已经配置了)。

1
2
3
4
5
6
7
8
9
10
11
12
13
14
15
16
17
18
19
20
21
22
23
24
25
26
27
28
29
30
31
32
33
34
35
36
37
38
39
40
41
42
43
44
45
46
47
48
49
50
51
52
53
54
55
56
57
58
59
60
61
62
63
64
65
66
67
68
69
70
71
72
73
74
75
public class RpcServer implements ApplicationContextAware, InitializingBean {

private static final Logger LOGGER = LoggerFactory.getLogger(RpcServer.class);

private String serverAddress;
private ZookeeperServiceRegistry serviceRegistry;//由IoC自动注入

private Map<String, Object> handlerMap = new HashMap<>();

public RpcServer(String serverAddress) {
this.serverAddress = serverAddress;
}

public RpcServer(String serverAddress, ZookeeperServiceRegistry serviceRegistry) {
// TODO Auto-generated constructor stub
this.serverAddress = serverAddress;
this.serviceRegistry = serviceRegistry;
}

@Override
public void setApplicationContext(ApplicationContext ctx) throws BeansException {
// TODO Auto-generated method stub
Map<String, Object> serviceBeanMap = ctx.getBeansWithAnnotation(RpcService.class);//通过注解去发现提供rpc服务的Bean
if (MapUtils.isNotEmpty(serviceBeanMap)) {
for (Object serviceBean : serviceBeanMap.values()) {
String interfaceName = serviceBean.getClass().getAnnotation(RpcService.class).value().getName();
handlerMap.put(interfaceName, serviceBean);//建立服务接口--服务实现类的映射
}
}
}

@Override
public void afterPropertiesSet() throws Exception {
// TODO Auto-generated method stub
EventLoopGroup bossGroup = new NioEventLoopGroup();
EventLoopGroup workerGroup = new NioEventLoopGroup();

try {
ServerBootstrap bootStrap = new ServerBootstrap();
// 配置Server端的NIO
bootStrap.group(bossGroup, workerGroup).channel(NioServerSocketChannel.class)
.childHandler(new ChannelInitializer<SocketChannel>() {
@Override
protected void initChannel(SocketChannel ch) throws Exception {
// TODO Auto-generated method stub
LOGGER.debug("initChannel");
ch.pipeline()
.addLast(new RpcDecoder(RpcRequest.class))// 处理Rpc请求 RpcRequest
.addLast(new RpcEncoder(RpcResponse.class))// 处理Rpc RpcResponse
.addLast(new RpcHandler(handlerMap));// 处理Rpc请求
}
})
.option(ChannelOption.SO_BACKLOG, 128)
.option(ChannelOption.SO_KEEPALIVE, true);

// 解析地址
String[] array = serverAddress.split(":");
String host = array[0];
int port = Integer.parseInt(array[1]);

ChannelFuture future = bootStrap.bind(host, port).sync();
LOGGER.debug("server started on port {}", port);

// 注册服务
if (serviceRegistry != null) {
serviceRegistry.register(serverAddress);
}
future.channel().closeFuture().sync();
} finally {
LOGGER.debug("worker group and boss group shutdown");
workerGroup.shutdownGracefully();
bossGroup.shutdownGracefully();
}
}
}

同时需要编写一个服务端的handler类(RpcServer当收到请求,并将其转换为RpcRequest后,RpcHandler将做进一步处理)

1
2
3
4
5
6
7
8
9
10
11
12
13
14
15
16
17
18
19
20
21
22
23
24
25
26
27
28
29
30
31
32
33
34
35
36
37
38
39
40
41
42
43
44
45
46
47
48
49
50
51
public class RpcHandler extends SimpleChannelInboundHandler<RpcRequest> {

private static final Logger LOGGER = LoggerFactory.getLogger(RpcHandler.class);
private final Map<String, Object> handlerMap;

public RpcHandler(Map<String, Object> handlerMap) {
this.handlerMap = handlerMap;
}

@Override
protected void channelRead0(ChannelHandlerContext ctx, RpcRequest msg) throws Exception {
// TODO Auto-generated method stub
RpcResponse response = new RpcResponse();
response.setRequestId(msg.getRequestId());
try {
Object result = handle(msg);
response.setResult(result);
} catch (Throwable t) {
LOGGER.debug("handle ocurred error ==> {}", t);
response.setError(t);
}
ctx.writeAndFlush(response).addListener(ChannelFutureListener.CLOSE);//写完然后关闭channel
}

private Object handle(RpcRequest request) throws Throwable {
String className = request.getClassName();//此处极易出错,需要保证客户端和服务端的className是一致的,否则直接GG
Object serviceBean = handlerMap.get(className);
if (serviceBean == null) {
throw new Throwable(String.format("can not find service bean by given name [%s] in server ", className));
}
System.out.println(handlerMap);
System.out.println(className);
Class<?> serviceClass = serviceBean.getClass();
String methodName = request.getMethodName();
Class<?>[] parameterTypes = request.getParameterTypes();
Object[] parameters = request.getParameters();
LOGGER.debug("handle request {}", request.getRequestId());
//以下为利用CGlib反射调用serviceBean的方法
FastClass serviceFastClass = FastClass.create(serviceClass);
FastMethod serviceFastMethod = serviceFastClass.getMethod(methodName, parameterTypes);
return serviceFastMethod.invoke(serviceBean, parameters);

}

@Override
public void exceptionCaught(ChannelHandlerContext ctx, Throwable cause) throws Exception {
// TODO Auto-generated method stub
LOGGER.error("server caught exception", cause);
ctx.close();
}
}

最后需要编写一个引导类,用于加载Spring.xml文件启动Spring IoC容器

1
2
3
4
5
6
7
8
9
public class RpcBootstrap {

@SuppressWarnings("resource")
public static void main(String[] args) {
// TODO Auto-generated method stub
new ClassPathXmlApplicationContext("spring.xml");
}

}

第五步: 编写common类

第四步涉及到几个POJO封装类,由于这几个类无论是客户端还是服务端都是需要,因此应该单独将其打包作为公共的jar包。

  • RpcRequest
  • RpcResponse
  • RpcEncoder
  • RpcDecoder
  • SerializationUtil
  • Constants
1
2
3
4
5
6
7
8
9
10
11
12
13
14
15
16
17
18
19
20
21
22
23
24
25
26
27
28
29
30
31
32
33
34
35
36
37
38
public class RpcRequest {
private String requestId;
private String className;
private String methodName;
private Class<?>[] parameterTypes;
private Object[] parameters;

public String getRequestId() {
return requestId;
}
public void setRequestId(String requestId) {
this.requestId = requestId;
}
public String getClassName() {
return className;
}
public void setClassName(String className) {
this.className = className;
}
public String getMethodName() {
return methodName;
}
public void setMethodName(String methodName) {
this.methodName = methodName;
}
public Class<?>[] getParameterTypes() {
return parameterTypes;
}
public void setParameterTypes(Class<?>[] parameterTypes) {
this.parameterTypes = parameterTypes;
}
public Object[] getParameters() {
return parameters;
}
public void setParameters(Object[] parameters) {
this.parameters = parameters;
}
}
1
2
3
4
5
6
7
8
9
10
11
12
13
14
15
16
17
18
19
20
21
22
23
24
25
26
27
28
29
30
public class RpcResponse {
private String requestId;
private Throwable error;
private Object result;

public String getRequestId() {
return requestId;
}
public void setRequestId(String requestId) {
this.requestId = requestId;
}
public Throwable getError() {
return error;
}
public void setError(Throwable error) {
this.error = error;
}
public Object getResult() {
return result;
}
public void setResult(Object result) {
this.result = result;
}

@Override
public String toString() {
// TODO Auto-generated method stub
return "[id: " + requestId + ", result: " + result + ", error: " + error + "]";
}
}
1
2
3
4
5
6
7
8
9
10
11
12
13
public class RpcEncoder extends MessageToByteEncoder<RpcResponse> {
private static final Logger LOGGER = LoggerFactory.getLogger(RpcEncoder.class);

@Override
protected void encode(ChannelHandlerContext ctx, RpcResponse msg, ByteBuf out) throws Exception {
// TODO Auto-generated method stub
byte[] data = SerializationUtil.serialize(msg);
LOGGER.debug("encode => datalength => {}", data.length);
out.writeInt(data.length);
out.writeBytes(data);
}

}
1
2
3
4
5
6
7
8
9
10
11
12
13
14
15
16
17
18
19
20
21
22
23
24
25
26
27
28
29
30
31
32
33
34
35
36
37
public class RpcDecoder extends ByteToMessageDecoder {
private static final Logger LOGGER = LoggerFactory.getLogger(RpcDecoder.class);
private Class<?> genericClass;

public RpcDecoder(Class<?> genericClass) {
// TODO Auto-generated constructor stub
this.genericClass = genericClass;
}

@Override
protected void decode(ChannelHandlerContext ctx, ByteBuf in, List<Object> out) throws Exception {
// TODO Auto-generated method stub
LOGGER.debug("decode => datalength => {}", in.readableBytes());
//按照自己的协议,进行解析;
//dataLength|dataContent
if (in.readableBytes() < 4) {
return;
}
in.markReaderIndex();
int dataLength = in.readInt();
if (dataLength < 0) {
ctx.close();
}

if (in.readableBytes() < dataLength) {//数据还未完全接受完毕,重置in的read Index;等待下一次decode;;
in.resetReaderIndex();
return;
}
byte[] data = new byte[dataLength];
in.readBytes(data);
Object obj = SerializationUtil.deserialize(data, this.genericClass);//反序列化
LOGGER.debug("decode => deserialize ok");
out.add(obj);
}


}
1
2
3
4
5
6
7
8
9
10
11
12
13
14
15
16
17
18
19
20
21
22
23
24
25
26
27
28
29
30
31
32
33
34
35
36
37
38
39
40
41
42
43
44
45
46
47
48
public class SerializationUtil {

private static Map<Class<?>, Schema<?>> cachedSchema = new ConcurrentHashMap<>();
private static ObjenesisStd objenesis = new ObjenesisStd(true);

private SerializationUtil() {
}

@SuppressWarnings("unchecked")
private static <T> Schema<T> getSchema(Class<T> cls) {
Schema<T> schema = (Schema<T>) cachedSchema.get(cls);
if (schema == null) {
schema = RuntimeSchema.createFrom(cls);
if (schema != null) {
cachedSchema.put(cls, schema);
}
}
return schema;
}

public static <T> T deserialize(byte[] data, Class<T> cls) {
// TODO Auto-generated method stub
try {
T msg = objenesis.newInstance(cls);
Schema<T> schema = getSchema(cls);
ProtostuffIOUtil.mergeFrom(data,msg, schema);
return msg;
} catch (Exception e) {
throw new IllegalStateException(e.getMessage(), e);
}
}

@SuppressWarnings("unchecked")
public static <T> byte[] serialize(T msg) {
// TODO Auto-generated method stub
Class<T> cls = (Class<T>) msg.getClass();
LinkedBuffer buffer = LinkedBuffer.allocate(LinkedBuffer.DEFAULT_BUFFER_SIZE);
try {
Schema<T> schema = getSchema(cls);
return ProtostuffIOUtil.toByteArray(msg, schema, buffer);
} catch (Exception e) {
throw new IllegalStateException(e.getMessage(), e);
} finally {
buffer.clear();
}
}

}
1
2
3
4
5
public interface Constant {
int ZK_SESSION_TIMEOUT = 5000;
String ZK_REGISTRY_PATH = "/registry";
String ZK_DATA_PATH = ZK_REGISTRY_PATH + "/data";
}

至此服务端代码编写完毕,接下来编写客户端代码。

第六步:配置客户端

和配置服务端一样,也是对客户端的Spring.xml进行配置

1
2
3
4
5
6
7
8
9
10
11
12
13
14
15
16
17
18
19
20
21
22
23
<?xml version="1.0" encoding="UTF-8"?>
<beans xmlns="http://www.springframework.org/schema/beans"
xmlns:xsi="http://www.w3.org/2001/XMLSchema-instance"
xmlns:context="http://www.springframework.org/schema/context"
xsi:schemaLocation="http://www.springframework.org/schema/beans
http://www.springframework.org/schema/beans/spring-beans-3.0.xsd
http://www.springframework.org/schema/context
http://www.springframework.org/schema/context/spring-context-3.0.xsd">

<context:component-scan base-package="dlut.rpc-client"/>

<context:property-placeholder location="classpath:rpc-client.properties"/>

<!-- 配置服务发现组件 -->
<bean id="serviceDiscover" class="dlut.rpc_client.ServiceDiscover">
<constructor-arg name="registryAddress" value="${rpc.registry_address}"/>
</bean>

<!-- 配置 RPC 代理 -->
<bean id="rpcProxy" class="dlut.rpc_client.RpcProxy">
<constructor-arg name="serviceDiscover" ref="serviceDiscover"/>
</bean>
</beans>

编写配置文件rpc-client.properties

1
rpc.registry_address=127.0.0.1:2181

第七步: 编写客户端

  • 编写RpcClient类

    1
    2
    3
    4
    5
    6
    7
    8
    9
    10
    11
    12
    13
    14
    15
    16
    17
    18
    19
    20
    21
    22
    23
    24
    25
    26
    27
    28
    29
    30
    31
    32
    33
    34
    35
    36
    37
    38
    39
    40
    41
    42
    43
    44
    45
    46
    47
    48
    49
    50
    51
    52
    53
    54
    55
    56
    57
    58
    59
    60
    61
    62
    63
    64
    65
    66
    67
    68
    69
    70
    71
    72
    73
    74
    public class RpcClient extends SimpleChannelInboundHandler<RpcResponse> {

    private static final Logger LOGGER = LoggerFactory.getLogger(RpcClient.class);

    private String host = null;
    private int port = 0;

    private RpcResponse response;

    private Object lock = new Object();;

    public RpcClient(String host, int port) {
    // TODO Auto-generated constructor stub
    this.host = host;
    this.port = port;
    }

    @Override
    protected void channelRead0(ChannelHandlerContext ctx, RpcResponse msg) throws Exception {
    // TODO Auto-generated method stub
    this.response = msg;
    LOGGER.debug("receive msg from ");
    LOGGER.debug("content => {}", this.response);
    synchronized (lock) {
    lock.notifyAll();
    }
    }

    public RpcResponse send(RpcRequest request) throws InterruptedException {
    // TODO Auto-generated method stub
    EventLoopGroup group = new NioEventLoopGroup();
    try {
    Bootstrap bootstrap = new Bootstrap();
    bootstrap.group(group)
    .channel(NioSocketChannel.class)
    .handler(new ChannelInitializer<SocketChannel>() {

    @Override
    protected void initChannel(SocketChannel ch) throws Exception {
    // TODO Auto-generated method stub
    ch.pipeline()
    .addLast(new RpcEncoder(RpcRequest.class)) //编码请求
    .addLast(new RpcDecoder(RpcResponse.class))//解码回复
    .addLast(RpcClient.this);
    }

    })
    .option(ChannelOption.SO_KEEPALIVE, true);
    LOGGER.debug("host => {}, port => {}", host, port);
    ChannelFuture future = bootstrap.connect(host, port).sync();
    future.channel().writeAndFlush(request).sync();

    LOGGER.debug("connected");

    synchronized (lock ) {
    lock.wait();//阻塞直到消息被RpcResponse被读取到
    }

    if (response != null) {
    future.channel().closeFuture().sync();
    }
    return response;
    } finally {
    group.shutdownGracefully();
    }
    }

    @Override
    public void exceptionCaught(ChannelHandlerContext ctx, Throwable cause) throws Exception {
    // TODO Auto-generated method stub
    LOGGER.error("client caught exception", cause);
    ctx.close();
    }
    }

  • 编写RpcProxy类,用于生成对RPC服务接口的代理

    1
    2
    3
    4
    5
    6
    7
    8
    9
    10
    11
    12
    13
    14
    15
    16
    17
    18
    19
    20
    21
    22
    23
    24
    25
    26
    27
    28
    29
    30
    31
    32
    33
    34
    35
    36
    37
    38
    39
    40
    41
    42
    43
    44
    45
    46
    47
    48
    49
    50
    51
    52
    53
    54
    55
    public class RpcProxy {
    private String serverAddress;
    private ServiceDiscover serviceDiscover;

    public RpcProxy(ServiceDiscover serviceDiscover) {
    this.serviceDiscover = serviceDiscover;
    }

    public RpcProxy(String serverAddress) {
    this.serverAddress = serverAddress;
    }

    @SuppressWarnings("unchecked")
    public <T> T create(Class<?> interfaceClass) {
    return (T) Proxy.newProxyInstance(
    interfaceClass.getClassLoader(),
    new Class<?>[]{interfaceClass},
    new InvocationHandler() {

    @Override
    public Object invoke(Object proxy, Method method, Object[] args) throws Throwable {
    // TODO Auto-generated method stub
    //封装请求
    RpcRequest request = new RpcRequest();
    request.setRequestId(UUID.randomUUID().toString());
    request.setClassName(method.getDeclaringClass().getName());
    request.setMethodName(method.getName());
    request.setParameterTypes(method.getParameterTypes());
    request.setParameters(args);

    if (serviceDiscover != null) {
    serverAddress = serviceDiscover.discover();
    }

    String[] array = serverAddress.split(":");
    String host = array[0];
    int port = Integer.parseInt(array[1]);

    RpcClient client = new RpcClient(host, port);
    RpcResponse response = client.send(request);//阻塞直到方法返回
    Object obj = response.getResult();

    System.out.println(Arrays.toString(obj.getClass().getTypeParameters()));

    if (response == null)
    throw new Exception("response is null");
    if (response.getError() != null) {
    throw response.getError();
    } else {
    return response.getResult();
    }
    }
    });
    }
    }

  • 编写服务发现ServiceDiscover类

    1
    2
    3
    4
    5
    6
    7
    8
    9
    10
    11
    12
    13
    14
    15
    16
    17
    18
    19
    20
    21
    22
    23
    24
    25
    26
    27
    28
    29
    30
    31
    32
    33
    34
    35
    36
    37
    38
    39
    40
    41
    42
    43
    44
    45
    46
    47
    48
    49
    50
    51
    52
    53
    54
    55
    56
    57
    58
    59
    60
    61
    62
    63
    64
    65
    66
    67
    68
    69
    70
    71
    72
    73
    74
    75
    public class ServiceDiscover {
    private static final Logger LOGGER = LoggerFactory.getLogger(ServiceDiscover.class);
    private CountDownLatch latch = new CountDownLatch(1);
    private volatile List<String> dataList = new ArrayList<>();
    private String registryAddress;

    public ServiceDiscover(String registryAddress) {
    this.registryAddress = registryAddress;
    ZooKeeper zk = connectServer();
    if (zk != null) {
    watchNode(zk);
    }
    }

    public String discover() {
    String data = null;
    int size = dataList.size();
    if (size > 0) {
    if (size == 1) {
    data = dataList.get(0);
    LOGGER.debug("using only data: {}", data);
    } else {
    data = dataList.get(ThreadLocalRandom.current().nextInt(size));
    LOGGER.debug("using random data: {}", data);
    }
    }
    return data;
    }

    //查看所有结点
    private void watchNode(final ZooKeeper zk) {
    // TODO Auto-generated method stub
    try {
    List<String> nodeList = zk.getChildren(Constant.ZK_REGISTRY_PATH, new Watcher() {

    @Override
    public void process(WatchedEvent event) {
    // TODO Auto-generated method stub
    if (event.getType() == Event.EventType.NodeChildrenChanged) {
    watchNode(zk);
    }
    }
    });
    List<String> dataList = new ArrayList<>();
    for (String node : nodeList ) {
    byte[] bytes = zk.getData(Constant.ZK_REGISTRY_PATH + "/" + node, false, null);
    dataList.add(new String(bytes));
    }
    this.dataList = dataList;
    LOGGER.debug("node data: {}", dataList);
    } catch (KeeperException | InterruptedException e) {
    LOGGER.error("", e);
    }
    }

    //连接到zookeeper
    private ZooKeeper connectServer() {
    // TODO Auto-generated method stub
    ZooKeeper zk = null;
    try {
    zk = new ZooKeeper(registryAddress, Constant.ZK_SESSION_TIMEOUT, new Watcher() {
    @Override
    public void process(WatchedEvent event) {
    if (event.getState() == Event.KeeperState.SyncConnected) {
    latch.countDown();
    }
    }
    });
    latch.await();
    } catch (IOException | InterruptedException e) {
    LOGGER.error("", e);
    }
    return zk;
    }
    }

    第八步:发送RPC请求

    1
    2
    3
    4
    5
    6
    7
    8
    9
    10
    11
    12
    13
    14
    15
    16
    public class App {
    @SuppressWarnings("resource")
    public static void main( String[] args ) {
    ApplicationContext context = new ClassPathXmlApplicationContext("spring-client.xml");

    RpcProxy rpcProxy = context.getBean(RpcProxy.class);

    IHelloService helloService = rpcProxy.create(IHelloService.class);

    String result = helloService.hello("world");

    System.out.println(result);

    System.exit(0);
    }
    }

3. 总结

参照网络上的一篇博客,自己照猫画虎搭建了一个轻量级RPC框架,了解学习了一些常听说的工具(例如Netty、Zookeeper)等在RPC框架中的应用场景。

搭建该框架的时候,使用Spring作为依赖注入框架,Netty实现NIO方式的数据传输、使用了高效的Protostuff对象序列化工具以及使用了Zookeeper作为分布式环境下的服务发现和服务注册。

具体来梳理下整个框架的运行逻辑。

  1. 启动RpcServer

    1.1 通过运行RpcBootstap类,加载了服务器端的spring.xml并启动了IoC容器,随后将xml文件中声明的Bean都实例化;

    1.2 扫描带有RpcService注解的类,建立服务接口—服务实现类的映射

    1.3 执行RpcServer的初始化操作,包括连接到Zookeeper服务进行服务注册,启动Netty NIO的事件轮询线程池和工作线程池等

  2. 客户端App类的运行

    2.1 加载客户端配置的spring.xml并启动IoC容器将声明的Bean实例化

    2.2 调用RpcProxy的create方法获取服务接口IHelloService的代理类

    2.3 执行代理类的hello方法,代理类将请求封装成RpcRequest类,然后连接到Zookeeper服务进行服务发现获取主机地址和端口号,然后调用RpcClient发送请求,获取结果。

    2.4 RpcClient配置并启动一个Netty EventLoopGroup,将封装的RpcRuest请求发送出去;

    2.5 RpcRequest经由RpcEncoder序列化为二进制数据,然后经由TCP协议发送出去;

    2.6 客户端收到来自服务端的二进制数据响应,然后通过RpcDecoder反序列化为RpcResponse类

  3. 服务器端接受到该RpcRequest的二进制数据,经由RpcDecoder反序列为RpcRequest类,然后通过服务接口—服务实现类映射表查找到对应的实现类Bean,再通过反射调用对应的方法,获取到结果;然后封装成RpcResponse类,随即被RpcEncoder序列化为二进制数据,并交由netty通过TCP协议发送到客户端;

详细代码参见:https://github.com/Spground/RpcDemo

4. Reference

https://my.oschina.net/huangyong/blog/361751?p=2&temp=1519544796844#blog-comments-list